
Uploading a video to YouTube takes a few minutes. On a computer, sign in to YouTube Studio, click Create, then Upload videos, and choose your file. On a phone, open the YouTube app, tap Create, then Video. Then fill in the screens YouTube shows you and pick who can see the video.
The steps are simple. What catches people out are the details around them: a 15-minute cap on new accounts, a rule that turns short vertical videos into Shorts, and two questions YouTube requires you to answer honestly. This blog walks through every screen on a computer and on a phone, then covers Shorts, the settings you can't skip, and fixes for the most common upload problems.
Before you upload: what your file and account need
Most uploads work first time. When they don't, the cause is usually the file or the account, not the upload itself.
File formats. YouTube accepts most video files, including MP4, MOV, AVI, WMV, FLV, WebM, 3GPP, MPEG-1, MPEG-2, MPEG-PS, ProRes, DNxHR, CineForm and HEVC (H.265), according to its list of supported formats. What it won't take is an audio-only file. An MP3 or WAV has to be turned into a video first, even if that is just a still image over the sound.
Size and length. A single upload can be up to 256 GB or 12 hours long, whichever is less (YouTube Help). If a file is larger than 256 GB, YouTube suggests compressing it with the H.264 codec.
The 15-minute limit. New accounts can only upload videos up to 15 minutes long. To go longer, verify your account with a phone number. You can do this in YouTube Studio under Settings → Channel → Feature eligibility, or when the YouTube app prompts you after you pick a longer video. Phone verification also unlocks custom thumbnails and live streaming from a computer, which YouTube groups together as intermediate features.
Export settings. If you're exporting from an editor, YouTube's recommended upload settings are a safe default:
How to upload a video on a computer
YouTube Studio is the most complete way to upload, and the only way to reach every setting. You can upload up to 15 videos at once (YouTube Help).
Step 1: Choose your file
- Sign in to YouTube Studio.
- Click Create in the top-right corner, then Upload videos.
- Drag your file into the window, or click to browse for it.
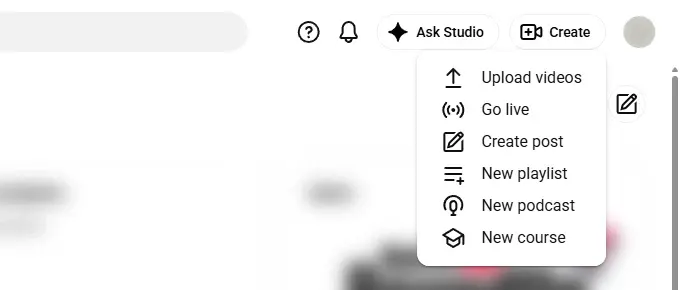
- 1Create, in the top-right corner
- 2Upload videos
The upload starts straight away, and YouTube saves it as a private draft at once, so you can leave and come back to it. It begins processing the video while you fill in the rest.
Step 2: Details
This is where the video gets its title, description and thumbnail. Only the title and the audience question are required. YouTube fills the title in from your file name, so change it before you move on.
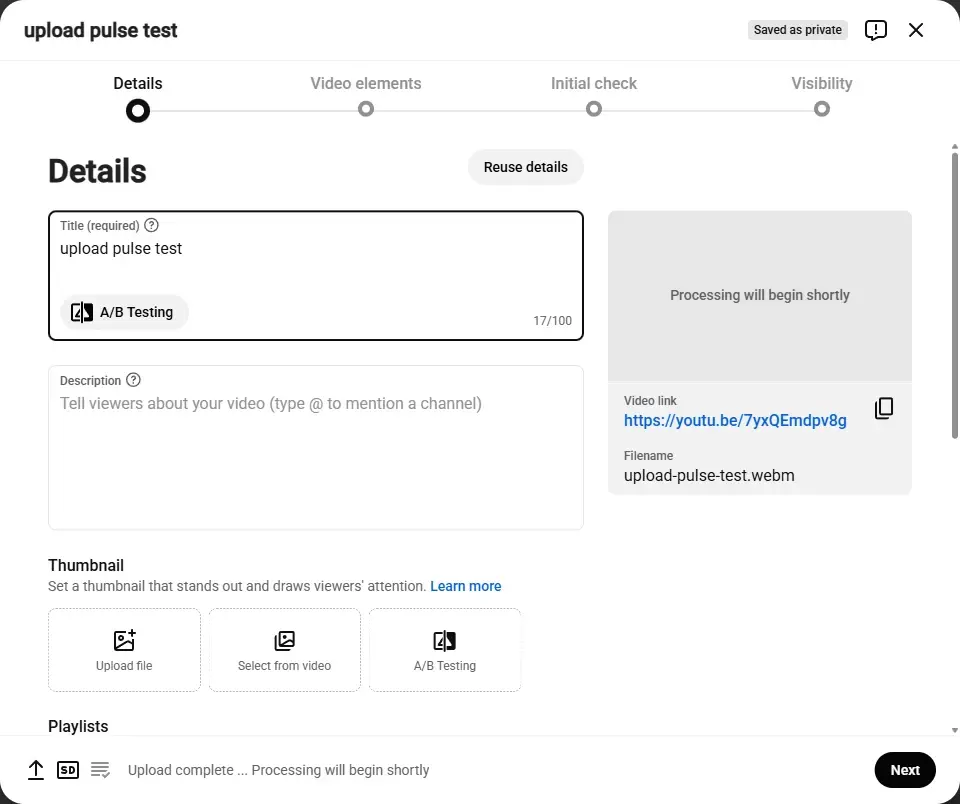
- 1The four steps of every upload
- 2Title (required), up to 100 characters
- 3Description, up to 5,000 characters
- 4Thumbnail: upload your own or pick a frame
- 5Next, once the details are done
- Title. Up to 100 characters. Put the words people search for near the start, because long titles get cut off in search results and on phones. If you're stuck, the AI Title Generator suggests ten titles built on real YouTube searches, each scored out of 100.
- Description. Up to 5,000 characters. The first two lines show above the "more" fold, so lead with what the video is about. This is also where timestamps go if you want chapters on the progress bar.
- Thumbnail. Pick one of the frames YouTube suggests, or upload your own once your account is verified. Custom thumbnails should be 16:9, at least 640 pixels wide, and in JPG or PNG format, up to 50 MB from a computer (YouTube Help). YouTube now recommends 3840 × 2160; our YouTube thumbnail size guide covers every spec.
- Playlists. Add the video to one or more playlists.
- Audience. Say whether the video is made for kids. This is required; see the section below.
Click Show more for everything else: paid promotion, altered content, tags, language, captions, category, comment settings and more. Tags matter less than most people think, but they help when your topic is often misspelled. The Tag Generator builds a scored set that fits YouTube's 500-character limit.
Step 3: Video elements
This screen is optional. It's where you add subtitles, an end screen pointing viewers to another video or your channel, cards that appear while the video plays, and a quiz. End screens need a video that is at least 25 seconds long. You can also add any of these later.
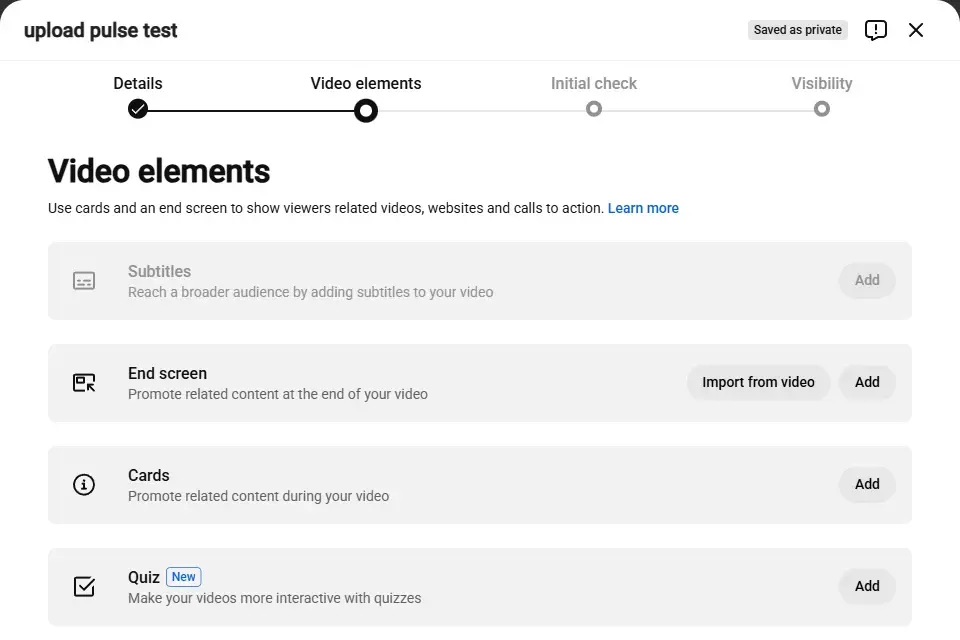
- 1Subtitles
- 2End screen (videos of 25 seconds or longer)
- 3Cards
- 4Quiz
Step 4: Initial check
YouTube calls this step Initial check. It looks for copyright issues and early problems with its Community Guidelines, plus ad suitability if you're in the YouTube Partner Program. The checks only start once standard-definition processing has finished, and they run in the background, so you can carry on and publish while they complete. If a problem is found, it shows on this screen and later on the video's row in your content list.
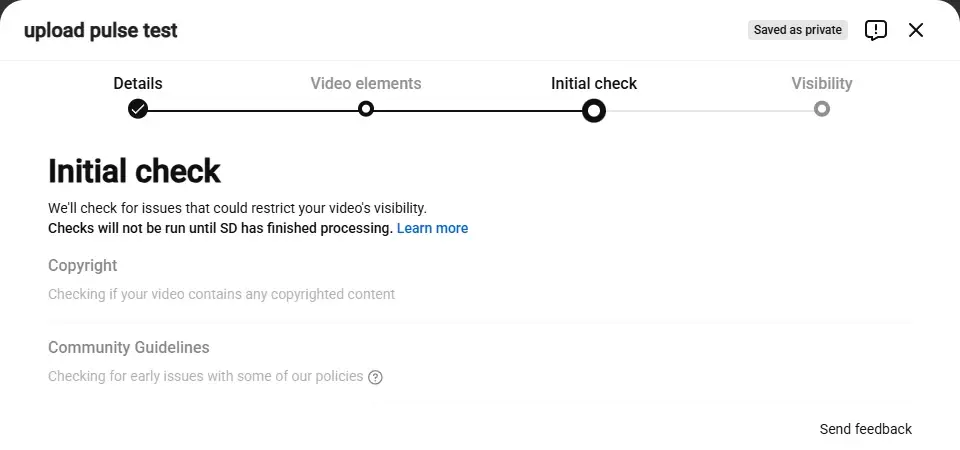
- 1Checks wait for SD processing to finish
- 2Copyright check
- 3Community Guidelines check
Step 5: Visibility
Choose who can see the video:
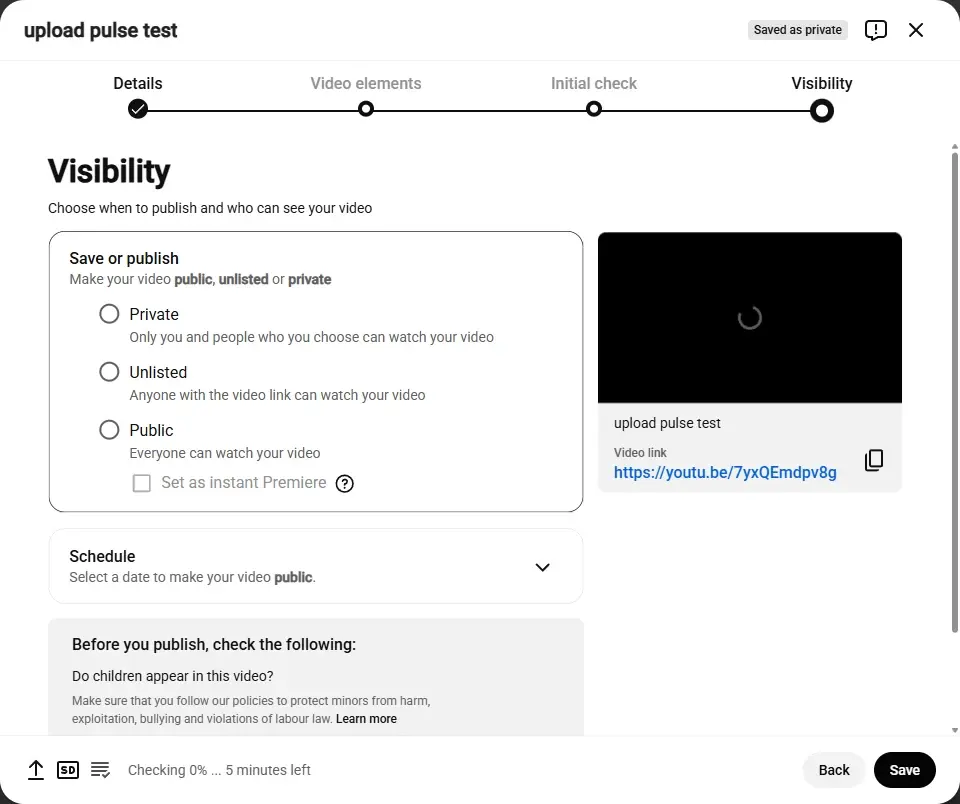
- 1Private, Unlisted or Public
- 2Schedule a date to go public
- 3Save to finish
Click Save and you're done. If you close the window before reaching this step, YouTube saves the video as private, so nothing goes live by accident.
How to upload from the YouTube app
The app covers the same essentials in fewer screens. On Android or iPhone (YouTube Help):
- Open the YouTube app and tap Create (the + button), then Video.
- Choose the video from your phone and tap Next.
- Add a title (up to 100 characters) and, if you like, a description, location and playlist. Choose the Visibility.
- Tap Next to reach Audience, and say whether the video is made for kids.
- Finish the upload. The video publishes with the visibility you chose.
Copyright checks run in the background here too. If you leave before finishing, the app keeps the video as a draft in your content list rather than publishing it.
Some things are easier on a computer. Subtitles, end screens and cards are fuller in YouTube Studio on the web, and the app accepts smaller custom thumbnails, up to 2 MB rather than 50 MB. A common routine is to upload from the phone you filmed on, then open YouTube Studio on a computer to finish the details before going public.
Uploading a Short instead
You don't choose to make a Short; the video's shape decides. A video that is three minutes or shorter and has a square or vertical aspect ratio is uploaded as a Short automatically (YouTube Help).
That works in both directions:
- To make a Short, film vertically (9:16) and keep it to three minutes or less.
- To keep a short video out of Shorts, export it in a wide format such as 16:9. A two-minute vertical clip will become a Short whether you meant it to or not.
- If a vertical video runs longer than three minutes, the app's Edit into a Short option lets you trim it down.
The two settings you can't skip
Two questions on the upload screens carry real consequences: one is a legal requirement, the other a YouTube policy. Either way, YouTube puts the responsibility on you.
Made for kids
Every video must be marked as made for kids or not made for kids. This is a legal requirement under the US Children's Online Privacy Protection Act (COPPA), and it applies wherever you live. YouTube is explicit that it is your legal responsibility to set this correctly, and that you shouldn't rely on its systems to do it for you.
Answer honestly, not strategically. Marking a video as made for kids turns off a long list of features on it, including comments, the notification bell, personalized ads, end screens and cards, and saving to playlists. Marking a children's video as not made for kids can lead to action from YouTube and, under COPPA, legal consequences.
Altered or synthetic content
If you used AI or other tools to make something realistic that didn't happen, YouTube requires you to say so during the upload. It's under Show more on the Details page. According to YouTube's policy, disclosure is needed for things like AI-generated music, AI-generated footage of a real place, or making it look as if a real person did something they didn't.
You don't need to disclose clearly unrealistic content, such as a fantasy scene, or small edits like beauty filters. Using a cloned version of your own voice for a voiceover doesn't need disclosing either.
After you publish: processing and a quick check
A video can go live as soon as standard-definition (SD) processing finishes. HD and 4K versions take longer, especially for long or high-resolution files. For the first minutes after publishing, viewers may only be able to choose a lower quality. That's normal and fixes itself; it isn't a problem with your file.
Once the video is live, it's worth one last look at the metadata viewers and search will see. Paste the video's link into the Video SEO Checker for a score out of 100 and a factor-by-factor list of what's helping and what to fix. Titles, descriptions and tags can all be edited after publishing without re-uploading.
Common upload problems and how to fix them
Most of these come down to two things: account verification and the video's shape. Verify your phone number once, and decide whether each video should be wide or vertical before you export it. With those settled, uploading becomes the quickest part of publishing.